
Quick Start
Claiming Your Box Account
You must activate your Box account before you can use Box.
- Click here to go to the Box account claim page.
- On the Box claim page, enter your NetID and password.
- Click Log in to claim your account.
Once your account is created, you will receive an email with further activation instructions.
Logging In to Box
(Note: If you use Georgetown Duo two-factor authentication to log in to Georgetown online services, you’ll be prompted to follow the additional steps to log in to Box with Duo.)
1. Go to box.georgetown.edu.
2. Click the Login to Box button, or click on the Login tab located in the top menu.
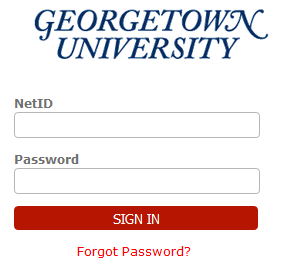
3. From the login page, enter your NetID and password.
4. Click Sign In. Your Georgetown Box home screen will be displayed.
Note: If you want to bookmark the Box page (for quick access to the login page), be sure to bookmark https://box.georgetown.edu rather than the Box login page itself.
Uploading Files to Your Box Account
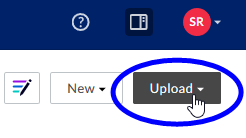
1. In your Box account, navigate to the folder to which you want to upload file(s).
2. Click the Upload button located at the upper right-hand corner of the screen.
3. Select Files from the drop-down menu. A Windows Explorer (Windows) or Finder (Mac) window will be displayed.
4. Navigate to the location of the file(s) you want to upload, select the file(s), and click Open. The selected file(s) will be uploaded to your selected Box folder.
Sharing a Folder
With the Collaboration feature, you can share a folder with others with whom you want to collaborate. When inviting a user as a collaborator within a folder, you will have the ability to set the level of access that user has to that folder’s content. (Note: You can only people to collaborate at the folder level; Box doesn’t allow collaboration on individual files, but you can share a link to a file with others.) Refer to the listing below to review the different permissions that accompany each access level.
To invite collaborators:
- Select the folder you want to collaborate with others.
- Click Share this Folder, and then select Invite Collaborators from the drop-down menu.
- In the “Invite” pop-up box:
- Enter the email address(es) of each person you want to invite.
- Click on the Invitee Permissions drop-down box, select the permission level you want to assign to the folder. (See below for a list and description of each permission level.)
- If you want, enter a Personal Message that will be sent to the invitees.
- Click Send Invites when you’re done.
Editor: An Editor has full read/write access to a folder. Once invited to a folder, they will be able to view, download, upload, edit, delete, copy, move, rename, generate and edit shared links, make comments, assign tasks, create tags, and invite/remove collaborators. They will not be able to delete or move root level folders.
Viewer: A Viewer has full read access to a folder. Once invited to a folder, they will be able to preview, download, make comments, and generate shared links. They will not be able to add tags, invite new collaborators, edit shared links, upload, edit or delete items in the folder.
Previewer: A Previewer has limited read access. They will only be able to preview the items in the folder using the integrated content viewer. They will not be able to share, upload, edit, or delete any content.
Uploader: An Uploader has limited write access. They will only be able to upload and see the names of the items in a folder. They will not able to download or view any content.
Previewer-Uploader: This access level is a combination of Previewer and Uploader. A user with this access level will be able to preview files using the integrated content viewer as well as upload items into the folder. They will not be able to download, edit, or share, items in the folder.
Viewer-Uploader: This access level is a combination of Viewer and Uploader. A Viewer-Uploader has full read access to a folder and limited write access. They are able to preview, download, add comments, generate shared links, and upload content to the folder. They will not be able to add tags, invite new collaborators, edit, or delete items in the folder.
Co-Owner: A Co-Owner has all of the functional read/write access that an Editor does. This permission level has the added ability of being able to manage users in the folder. A Co-Owner can add new collaborators, change access levels of existing collaborators, and remove collaborators. However, they will not be able to manipulate the Owner of the folder or transfer ownership to another user.
Sharing a File
With Box, you can make bulky attachments and email bounces a thing of the past.
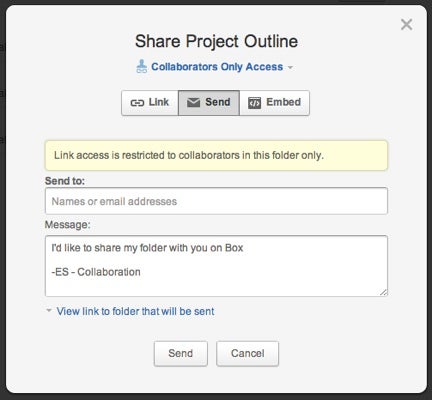
You can use Box to send a link that others can use to access a file from your Box account, first right-click on the file’s icon (or click on the little box with the downward arrow) to display the dropdown menu. Next, hover over ‘”Share” and choose “Send Link to File”.
- Right-click on the listing of the file you want to share, and then select Share from the drop-down menu.
(fileshare1)
- In the pop-up window, enter the email address(es) of the individual(s) to whom you want to share the file. You can add additional email addresses by clicking next to the last address you entered to display your cursor, and then just entering the additional address.
- (optional) Add a personal message in the Message box.
- Click Send. Your recipients will receive an email from Box inviting them to view your shared file.
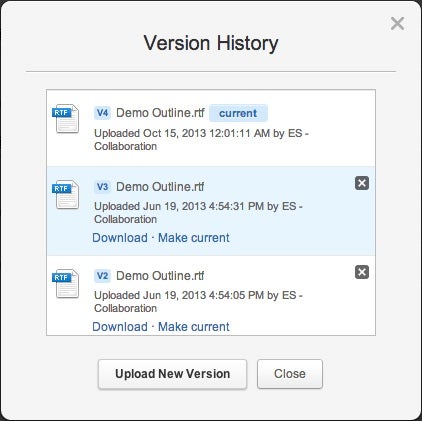
Viewing a File’s Version History
All Box accounts come with ‘Version History’ which allows you to maintain a recent history of a file. If previously uploaded within the same directory, the file will overwrite itself and become the current version on the account. With Version History, a history of previous file versions will remain intact and you will be able to recall previous versions of the uploaded file.
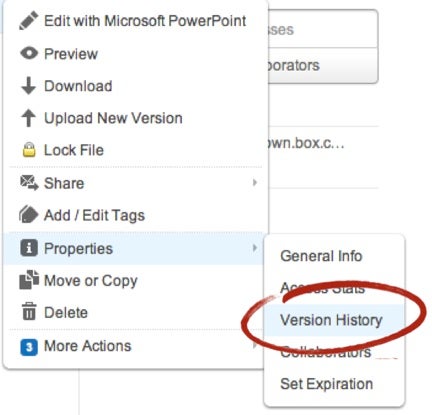
To locate the version history window, click on the little box with the downward arrow and select ‘Version History’ from the ‘File Properties’ sub menu.
On this pop-up window you can revert back to an older version of the document by choosing “Make Current,” download an older version by choosing “Download,” or delete a previous version by choosing the “X”.
Logging Out of Box
- Click on the circle with your initials in it, located at the top right-hand corner of the screen, as shown in the example below. Select Log Out from the drop-down menu.